Router Table
This router table features TONS of storage and doubles as an side wing support for my table saw fence!
This post contains affiliate links, for more information see my disclosures page.
Check out the tools I use.
This project is sponsored by NewAir. You can get 20% off a portable air conditioner using discount code "YCMT2" at checkout. Link here.
Products used:
T-Track: https://amzn.to/2Pgmeg3
Miter/T-Track Combo Track: https://amzn.to/2OHWIPQ
Mag switch: https://amzn.to/2MBaGFS
Casters: https://amzn.to/2vQerh0
Feet: https://amzn.to/2w9OKXP
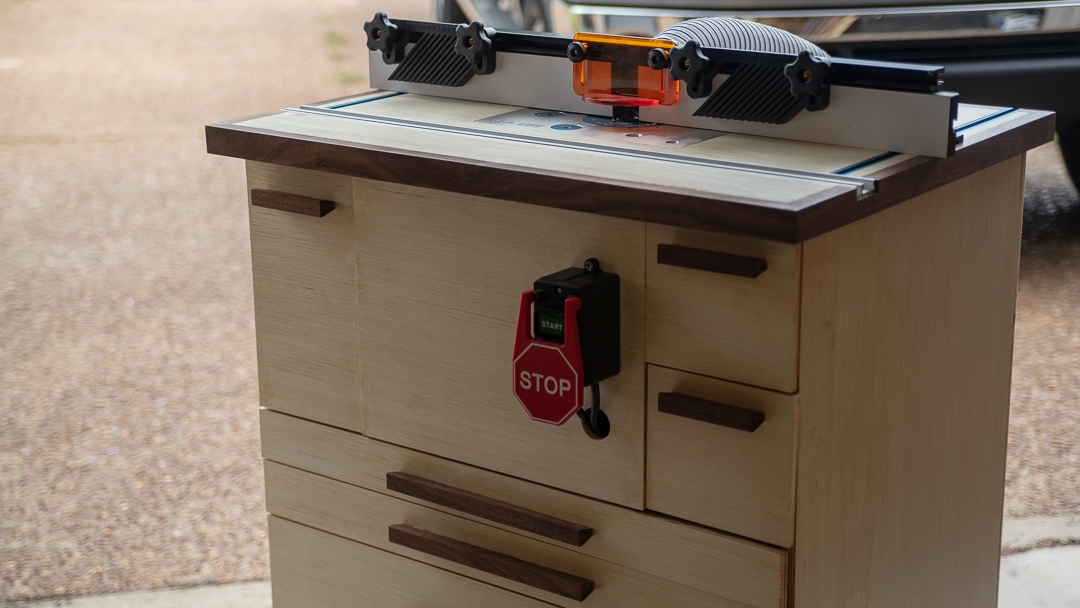
Router Fence: http://www.rockler.com/rockler-pro-router-table-fence
Router Lift: http://www.rockler.com/rockler-pro-lift-router-lift

Like all my plywood projects. This one started with breaking sheets down with my circular saw, then a lot of table saw cuts, and some crosscuts at the miter station.
I’m laminating the top together, so I do it first to give the glue plenty of time to dry. I’m laminating two sheets of plywood to make creating the router lift hole easier. Normally for a router lift it takes routing two different patterns at different depths. But instead, I’m going to cut two shape out of each sheet and then glue them together.
I cut the shape out of the router lift plate out of 1/4” plywood. I screw it a 3/4” sheet before I transfer the hole and then start laying out what material needs to be removed so the router will sit in the hole.
Not surprisingly, I didn’t nail the fit the first time. So I tried to fit the router lift and made a few more adjustments until it was good.
Then I glued both sheets together, and this is why I screwed them together before I started sketching on the second sheet. Those screw holes act as registration points to make sure everything lines up exactly the same as it did when I started laying out for the router lift. Those screws went where the miter track dado will go so the holes won’t be a problem later. A few more screws through the underside to clamp it together and this gets set aside to dry.
After it dries I trim up the edges at the table saw, and then start edge banding the top with walnut. I did this with my assembly table when I made it and really liked the look, so I think walnut edge banding might turn into my theme for shop furniture.
A little wood putty filled in some of the gaps and tear out before I moved on to cutting the grooves for the tracks. First I cut the wide groove that’ll hold the combination miter and t-track for jigs and feather boards. Next I cut some smaller grooves for t-tracks perpendicular to the first track for the fence.
Those grooves will stop at the first groove. So I marked the edge of the first groove, and where the blade stops cutting. That way I could stop cutting when those lines meet, and not accidentally cut too far. But once I started cutting I completely forgot about that and cut too far anyway. Fortunately, that incident had me paying more attention for the other side.
The repair job was pretty straight forward. I just used a chisel to finish cutting out a rectangle as deep as the first sheet of plywood. Then used an offcut from that type of plywood to make a patch and CA glued it in.
Time to start working on the cabinet. I drill pocket holes in all the pieces, then cut a big slot out of the back piece to accommodate the dust collection hook ups. Screwing the cabinet together went really quick, but I did run into a slight issue.
The front just has two stretchers running across it, but I’d cut them about 3/16” of an inch short. Fortunately, I had some scrap pieces that were just the right thickness. So I cut them to size and glued them on the ends, then screwed it back together.
For shop projects, I like to keep the drawers simple. These are entirely made from 1/2” plywood, wood glue, and brad nails. I just glue and brad the sides together before gluing the bottom on and using it to square up the sides.I made two deep drawers that could store routers, router bases, and jigs.
Then two rather shallow drawers to keep Allen keys, wrenches, bits, flat jigs, and stuff like that.I normally use ball bearing slides, but I decided to try wood runners on this project. I cut down some 3/4” plywood and used spacers to glue them in place in the cabinet. Then added the runners to the drawers, again using spacers to get them a the proper height on the drawers.
With the bottom drawers done, I took everything out and secured the top, again with lots of pocket screws. Then I began adding the tracks to the top, and installing the router lift. I used the router lift itself as a guide to perfectly align holes to tap in some t-nuts that’ll let me bolt the lift to the top. I also added leveling screws to each corner of the lift. I can use these to perfectly flush up the router lift to the top.
Then it was on to taping off the hardware and starting to apply finish to the top and cabinet.
While I pondered the next bit, I went ahead and put the router in the lift and installed the adjustable feet and casters to the cabinet.
I ended up installing the dust bucket first, because I realized the dividers would have to go over mounting flange for it. I marked the flange location on the dividers before drilling the pocket holes so I wouldn’t be screwing through the metal. These drawers won’t hold much weight so I just used 1/2” plywood runners with CA glue and a square to keep them level.
The two smaller drawers have bit holders from Rockler, and the other side is just a narrow but deep drawer I might put my trim routers in, or maybe some table saw stuff as this will live besides the table saw.
I wanted the cover for the dust bucket to be easily removable, so I drilled pockets for some small magnets and then epoxied them in place. Next was adding the magnetic switch. I just screwed it to the cover and drilled a hole for the cables and fed them around to the back.
The only thing left at this point was to add some handles. I made these simple pulls on the router table. CA glue held them in place, then I added screws from the inside.
If you want to see how I made them, a long with a lot of other things you can do with a router table, then make sure you subscribe.
My next video will be going over a lot of cool stuff that router tables make easier and the jigs that Rockler sent me to use with this.